10.19.2011

Homeschooling

Because of the nature of our business, Dan and I have decided that we are going to start homeschooling Caden and Alanna next semester.  That gives me some time to finish up all of my work for this years weddings before we start and the kids a chance to say good bye to their friends.  We are not telling them yet, however.  I think we'll wait until the first part of December.  I'm excited.  I have been researching endlessly for the last couple of weeks and I finally have a grasp on things.

Our curriculum is picked out and we're working on creating a space for homeschooling.  Mind you, that's difficult in our small 3 bedroom townhouse with no garage and no dining room.  yeah... little.  Part of the living room will be converted.  

Since then, I've been hooked on interest searching for homeschool room ideas.  Here's a few of my fags:


Source: ana-white.com via Deidre on Pinterest


Source: ana-white.com via Deidre on Pinterest

I think I have kind of narrowed it down to what I want due to the fact that our space is so small.


Source: ikea.com via Deidre on Pinterest

I want to use the shelf above against the wall so I can store all of their homeschool supplies here.  I'm sure we will eventually grow out of it, but that will probably take some time before we do. :)


Source: ikea.com via Deidre on Pinterest

Then I will purchase this desk to attach to the shelf.  I like the idea of working in one area not each child in different areas. 

Then I will use these for storage on the shelf.  They match the rest of our living room, which is important to me.  I hate having mismatched stuff everywhere.  


Source: ikea.com via Deidre on Pinterest


Source: ikea.com via Deidre on Pinterest

Now I just need to talk dan into letting me spend a couple hundred dollars on that plus the additional 500 or so I'll be spending on curriculum.  Either way, it's still cheaper than what we are spending on private school right now!!! WOOHOO!!!

10.03.2011

absent

I know I have been sooo absent lately and I'm sorry!  I miss crafting so much but I am beyond excited for where life is headed lately.  My photography  business is going to be undergoing even more major changes in the next month or so and I will be starting some new adventures.  

The biggest news... I'm working on writing a book!  WOOHOO!  Who knows where this path will lead but I am so excited and beyond nervous.  Writing a book and actually getting it published is only for lucky people... or at least I've always thought.  But opportunities have been coming my way and God is pushing me in new places.  So stay tuned.

9.25.2011

Money saving deals!

Do you have someone in your life who is an amazing bargain shopper???  Someone you may just be a tad jealous of because if you had more time, you would do the same thing?  My sister-in-law, Chrissy, is that person in my life.  She is so great at finding deals and I am not.  I love to land a good deal, I just don't have the time for it.  Well, Chrissy has a new blog that she is posting current deals so that people like me can just benefit from her crazy shopping adventures.  Doesn't get better than that!

So go over and check her out here.

You'll love her for it!  I love her for it.  But I also love her for my sweet little niece who finally loves me too :)

This is why she loves me
We give her donuts when she stays the night with us...

and trips to dairy queen with her cousins!  Yup. Bribery.  It works.

9.07.2011

Spider Snack

This week I am in charge of snacks for my daughters kindergarten class of 8 kids.  (I adore her little private school class... amazing).

Well, this is what I made them for tomorrow (not our normal organic, healthy snack, but oh well:)


I used m&m's for the eyes, but they were so easy to make!

You can find the directions here.

Obviously these would be adorable for halloween, but why not for a little treat?  There are some photos you can find online that you can see of these made with licorice sticks instead.  They're really cute too.

Enjoy!

9.02.2011

Project Run and Play

Have you seen the latest entries for project and play?  I love love love the competition!


ugh... to sew again.  Dear sewing machine, I miss you!!!

8.22.2011

Photo wall

We have lived in the same house for the last 3 years and I have yet to put up any photos of my family.  Not to mention we haven't had a family photo since we were a family of four (now we are a family of 6)!  Pathetic.  The thing that makes it worse is that I'm a photographer. A professional photographer none the less.  Ridiculous.  My mom calls me the plumber who doesn't fix her own plumbing. 

See, we're renting and I hate the place.  Mostly because it is too small and there's no privacy due to the fact that we share a yard withe three other families (townhouses).  I've never considered it our home, which is why it looks thrown together.  But, I've been trying to get everything set up so when we buy a house within the next year, I'll be happy with what we have.  So, I want to put together a photo wall.

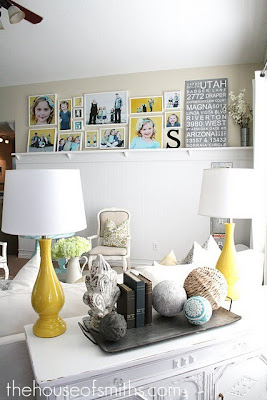
Check out the inspiration:

This is from the house of Smiths.
I love the size differences in the photos and love the canvas with all their past addresses.
Check her website out.  She is such an amazing decorator and her daughters always look so put together.


this is from a magazine, but I'm not sure which.

I love the idea of the words, but I'm soooo sick of vinyl.  I want to do something words, maybe things we hope to instill in our children like peace, contentment, etc. (goals basically).  I'm thinking of some kind of art work but I haven't figured out how to pull it off yet.  I'd like to get them mixed in with family photos.  We recently took on a husband and wife associate photographer team and they will be doing some family photos for us soon.  I'm excited about that!  We desperately need them!

Anyway, my wheels are turning and we'll see what I come up with in the next month or so.  Hmmmm....

7.30.2011

I have to show you the coolest little pincushion I have seen yet!  This is from Cathrine at Cat on a Limb.
Check it out here.


Hope you are all enjoying your summer!  I'm about to have three weekends off from all the weddings, but you can imagine how busy those three weekends will be with our family.  Oh winter... I hate the cold you bring, but how I miss the crafting.  sigh.

7.19.2011

Kimono Shirt - TUTORIAL

A few weeks ago I shared with you the shirt that I made for myself.  I am FINALLY getting around to making a tutorial.  Sorry... it's wedding season.  What can I say?

You will need a couple of yards of a nice knit fabric.
With your fabric folded in half make sure the stretch of the fabric is up and down to you.  As shown in the picture above. 

Now fold your fabric in half one more time with the stretch still going up and down.

Find a t-shirt that fits you well and fold it in half.  Then lay it on top of your fabric.

Cut out the neckline.  I made mine the same on the front and back (pretty 80's!), but you don't have to.

Decide where you want the bottom waist band to start and mark it on your t-shirt.  I did this by putting the t-shirt on and placing a pin where I wanted it.  Then I marked on the fabric.  Refer to the above picture and below picture.


Now decide how wide you want your arm holes.  Keep them pretty wide!  Then make a slanted line just past the mark you made for your waist band will start.

Now pin two layers together.  We are NOT sewing all four layers, just two!!!

Sew your two layers together right over your marked line.

Now cut the excess fabric off, leaving a 1/4 seam.


Do the same thing on the other side.

Now cut off the excess fabric about a 1/2 inch below the mark you made for your waist band placement.

Now you are going to cut out your waist band.  I made mine about 13 inches wide.  For the length, measure your waist and subtract 2 inches.  
Make sure your stretch is going right to left for the waist band.

Fold the fabric in half and sew along this seam.

Turn your fabric right side out and fold it in half as shown above.

Take your waist band and put it over your shirt bottom.  You should have 3 layers of fabric now.  Pin it in place. The waist band should be smaller than the shirt. So, you will have to ease this together.  Sew it on!

Once you're done with the waist band, you should have this.

For the arm holes cut a strip that is a 1/2 inch longer than the circumference of your arm hole and 3 inches wide.  Now sew this the same way you did your waist band.  

Sew the short sides together.  Turn it right side out and fold in half wrong sides together.  

Sew it on your arm hole with right sides together

Run the seam through a server or do a zig zag stitch.

The neckline is the same thing, but instead of sewing the short sides together first, I folded them over each other like bias tape (refer to the above photo).

Now top stitch just below the seams on your arm holes and neckline.  This will keep the fabric from flipping the wrong way.

And.... you're done! 

I love the simplicity of this shirt.  Enjoy!

7.02.2011

I did it - FINALLY!!!

I have been wanting to start making clothing for myself for some time now.  Every time I sat down to do so, I felt too intimidated.  On Thursday morning, I decided enough is enough and I did it!  I made a shirt and I LOVE the shirt.  It's my new fav.

The pictures are not super awesome, but whatever.  You get the idea. :)


It's a super simple construction and flatters any figure.  You can't beat that!

I want to try another one with smaller sleeves.  It's so versatile and easy and I have so many more ideas for it.

I totally screwed up the sleeves by pulling too much on the fabric.  Which is why there is such puckering on the hem of the sleeves.  Oh well.  It's the first time I've both made something for me and sewn with knit.  I love it anyway!  I'm thinking it would be cute with a white A-line skirt too, which I plan on making soon.

Tutorial coming SOON!

7.01.2011

Wrapped ice cream sandwiches

One of my kids favorite desserts are homemade ice cream sandwiches.  They're so easy and oh-so-yummy!  But, they're messy.  So, I figured out how to wrap them in paper to keep them from getting too messy (not that they won't, but every bit helps).


YUM!

My favorite chocolate chip cookie recipe is the back of the Nestle Toll House bag.  You know... Nesalay Tollhousa.  (If you loved friends as much as me, you get it)
We're bringing these for a cookout tomorrow so I doubled the recipe to make about 30 sandwiches.
Let your cookies cool completely! 

Once they are cool put one scoop in between two cookies.  You should let the ice cream soften a bit so it doesn't break your cookies when you push them together.

Now, cut a square from freezer paper or wax paper (I used freezer paper).  They don't have to be perfect.  Mine were about 8 inches, but no need for measuring.

Fold your square into a triangle.  If your corners do not match up, just fold it nicely and don't fret.

Now fold the bottom of your triangle up about an inch.

Put your cookie on top.

Fold the corner up to the middle of the cookie.

Fold your sides in to the center and slip one side into the other.

If you make your squares really big, you could fold the sides first and then the top triangle under and over to help hold it nicely.  This seemed to work just fine, though.

We'll see how it goes tomorrow. 

Now, off to sew some outfits!